About Me

Monday, February 1, 2016

Backward Chaining...It's Not Exclusive To ABA!

Chaining is a technique used in Applied Behavior Analysis (ABA) to teach students complex tasks by breaking each step in the process down into individual behaviors (discrete responses). 

During Backward Chaining all behaviors involved in a process are completed by the clinician (or parent) except the last step which is left for the student to complete.

I love to use backward chaining to help my dyslexic students learn the letter names.

First the student selects a phonemic object for each letter.  These objects must begin with the same sound as the letter we are targeting.  A = Apple (or in this case Asher because it happens to be his name), B = Batman, C = Cookie, etc.

The verbiage becomes "B says /b/ like Batman."

When completing drill and practice activities, the phonemic objects are available, the student is presented with the flash card, and the clinician says:

"This letter says /b/ like Batman. It's the letter __."

Hopefully the student will be able to supply the "B".  However, if they are unable to perform the task a phonemic cue can be given as another cuing level.

When the student begins to show success with supplying the final step in the chain, the clinician can then begin supplying all but the last two responses:

"This letter says /b/ like _____, it's the letter ____."

Until ultimately the student is able to supply the entire sequence (without cues) when shown the 
flash card.

I'm including a video to help demonstrate how backward chaining can be used to teach letter names/sounds. Many thanks to Asher for being such a hard worker!  
He's a super star reader these days!!
Disclaimer: I purposefully allowed him to struggle on some trials longer than I normally would for demonstration purposes.

Sunday, January 17, 2016

Art Therapy in the Speech Room


A couple of years ago, one of my first grade students had a piece of art entered into an art auction. His parents did not attend the auction, so I purchased his painting and promptly hung his art in the therapy room.  He was thrilled, but all of my other students wanted to know when they were going to get to paint a picture for the room.

While I have always liked to include arts and crafts in my day-to-day therapy activities, I usually stick to really basic activities that can be completed in one session.  There are many reasons for the simple, quickly completed, craft selection however it usually boils down to the
fact that I have very little available storage and well over 45 students on my caseload.

I originally thought about doing a joint project similar to this one that our after school Barton Reading and Spelling students completed:

This project was great because they were each painting an individual canvas, but had no idea what, exactly, they were creating.  Teamwork at its finest : )

After much debate and consideration, it was decided that canvas painting would be reserved for the 3rd graders (highest grade in my building). We took a vote, and decided to paint inspirational sayings.  The students researched various sayings, created a rough draft on paper, and then began the actual painting. This process obviously took more than a few therapy sessions, but it was well worth the effort.


Since these students are third graders, this was an excellent opportunity for them to practice their speech objectives and/or learn new skills in a relaxed environment.  They were encouraged to use learned skills in conversational speech. However, the most amazing thing to watch was their social interactions. Students don't get to practice social skills nearly often enough in naturalistic environments.
We are pretty happy with the results!  What do you think?

Tuesday, May 19, 2015


I've been organizing again! My kiddos with literacy concerns often need an object to help them associate letter sounds. Organizing these objects has been a challenge. I finally hit upon an idea to use video cassette boxes and I love how it is working out so far. Take a look:


I organized by lesson number and put a list of objects included for each letter, on the back cover.

Friday, February 7, 2014

One of the best tools I have found are these fabulous "Rain Beads".  A friend of mine discovered these beads several years ago.  She brought them to school one day and shared them with me.  Up until that point I had been using sand in my multisensory trays.  


The students LOVE the beads and we no longer use sand at all.  

The beads feel so much better!

We've had such good results with the beads that we now sell them.  $5 for a 16 oz. bag.  Each bag will fill at least 2 trays.  Well worth the money : )  

P.S. I have a few OT friends who use the beads in buckets for sensory activities.

Monday, August 5, 2013

My Picture Book Collection


I Love Picture Books!!!!!  My collection is out of control.


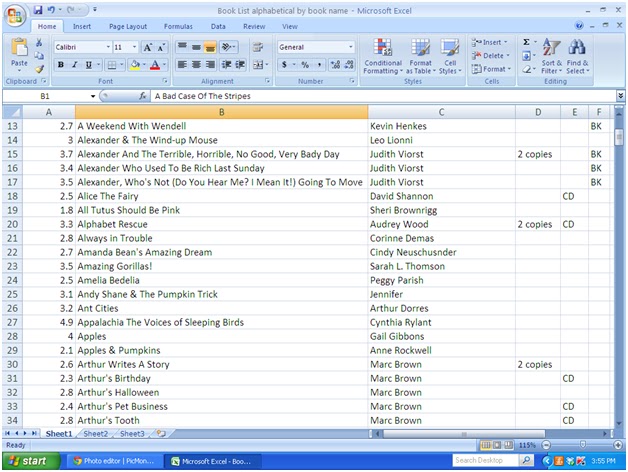
They are organized by AR level, but I needed a method for indexing, so I made an Excel document that works wonderfully well.  Plus, it's very easy to update.                    


The advantage to using Excel is that it allows you to sort by column.  I made columns for AR level, Book Title, and Author.  I also added columns to signify if I had a CD of the book, multiple copies of the book, and if I had a "Book Kit" (set of supplemental materials to teach the concepts in that particular book).  I then printed a sort by title and a sort by author, and put them in a folder that stays on the top of the bookcase. This system allows me (or others) to quickly find any book in my library. As I buy new books, I write them in and only update on the computer after I have several new books to add. 


I love to have audio recordings of my picture books.  Ever wonder how to store those CDs? 
Keeping the CD with the book used to be a problem for me until I purchased some CD sleeves and some double sided tape:


Now my CDs are always with the corresponding book.....as long as I remember to take them out of the CD player!

August SLP Link Up

All Y'all Need asked for SLPs to describe how we are getting ready for school this August. It's the last week of freedom and I'm learning to blog!  So here's my first Link Up....

Buying:  My daughter a new laptop.  She will begin college in two weeks : (
I'm a little bit sad about that.  The first day of school will begin with me heading off to school all by myself this year.  There are many perks to working at the same school your children attend.  This school year will have a very different feel, but I'm sure we will all adjust.  One thing about being a public school SLP....I will probably be too busy to notice!  At least for the first month or so anyway.

Trying:  At the end of last school year, a couple of my teacher friends and I decided to offer a technology workshop for fellow teachers over the summer.  My part included Google Drive, Sites, and Blogger.  The unusual thing about that is that I know very little about technology.  I've never followed a blog, much less had one of my own.  The last month has been a real learning experience for me!

Speeching:  Organizing!  I love to organize!  It's a passion of mine.  Since I am about to begin my 22nd year of teaching I have pretty much organized everything in sight. However, I have spent a large part of this summer cleaning out the old and creating some new materials.  I have less than a week to complete all those projects.  Yikes!

Word Families

Literacy has always been a love of mine.  Working with language based learning disabilities is very rewarding.  Many of these students have missed the rules that govern written language.  Explicit instruction in these areas is needed.  For more information on Language Based Learning Disabilities:  

http://www.asha.org/public/speech/disorders/LBLD.htm


When working with these students I typically use Orton-Gillingham based strategies: http://www.orton-gillingham.com/


My students use the raised letter cards, phonemic objects, and sand/bead trays to enhance learning.  One of the best strategies I've found to use with whole-to-part learners is word families.  My kindergarten students don't always understand the importance of learning those odd looking letters, and the sounds they create until they realize that all those crazy letters make words.  I used the following resources to create some word family kits:  We made word wheels with this book:


Turn–to–Learn Wheels in Color: Word Families


(Professional Book) | Grades K-2
List Price: $20.99Our Price: $15.74
                                                  This is one my son made in his 
                                   fraternity colors : )


and mini books with this one:

25 Read & Write Mini-Books That Teach Word Families


( Professional Book) | Grades PreK-1
List Price: $11.99
Our Price: $8.99

I also made some file folder word walls that I found in another Scholastic book.
Instead of writing words on the inside of the folder as shown in the example, I decided to use this space for a Rapid Automatic Naming (RAN) task.
The students compete only against themselves to increase their time.  They love these tasks!

 
I placed a library pocket on the back of the folder to house the word family "marker" the students use to complete the RAN task.

Using a laser printer and blank business cards, I created flash cards for each word family.  The word is printed on one side, and a picture on the flip side.  Students can use these to rapidly name words as well.


Once I had the materials made, I had to organize them.....so I decided to die-cut the letters for the word family, glue them to a white mailing envelope, laminate the envelope, and tah dah!  Organized word family work!!

We have so little time with our students in public school, I like to make every minute count.  These are quick, organized activities that really improve student performance.